Drupal 8 is the latest version of Drupal, including major improvements over version 7 and taking a major leap in technology, performance and extensibility, its new PHP object-oriented based "core" makes use of some of the best known and successful Symphony, Composer, Twig and more, improving user experience and facilitating development work.
In this article we are going to show you the simplest and fastest way to have a Drupal 8 web working in Spanish in a very short time, in short 5 minutes will be enough (not counting file download/upload or installation time, which varies depending on the used server).
What do we need?
Before starting, we need to have an environment where you can perform the installation that meets the technical requirements to run Drupal 8, most commonly a server with Apache 2.x, MySQL (5.5.3 or higher) and PHP (5.5.9 or higher), These requirements are very common so virtually any hosting provider offers them within their services´ catalog.
There are also some automated installation solutions (Installatron is one of the best known) that includes Drupal within its application catalog. In case you do not have a solution of these characteristics, the different control panels that are usually incorporated into each hosting service as (cPanel, DirectAdmin and other) greatly facilitate the different tasks to be carried out for the installation.
Some specialized hosting providers like Pantheon.io even offer a complete automated installation making it possible to create a site in Drupal 8 in a few clicks.
In any case, the manual installation system is very simple, and the tasks to be carried out are very similar using the hosting control panel that is used.
There are two essential components to the operation of Drupal:
- The system source code. It consists of a tree of folders and files (most of which are written in php) that must be executed on the web server, usually in a folder called "public_html", "www" or "htdocs", both the location and the name Of this folder depends on the configuration that the hosting provider has established in the server operating system, for this article we will assume that the folder is "public_html" and we refer to it as the "root" folder.
- The database. All the information that the source code needs to store is stored in a database managed by the database server, the architecture of the systems depends on many factors and can be very varied and in this article we are going to assume that both The web server as the database are the same, as it is the most common configuration in the small size accommodations.
Minute 1. Prepare the source code
To prepare the environment we need to incorporate the elements that will shape our system, first we will obtain the necessary source code, performing the following steps:
1. Download the latest available version of Drupal 8 from Drupal's official website. We will get a compressed file with the tree of folders and files that make up the source code.
2. Next, either through the file manager of the hosting control panel or through an FTP client it is necessary to upload the downloaded file to the root folder of the web server.
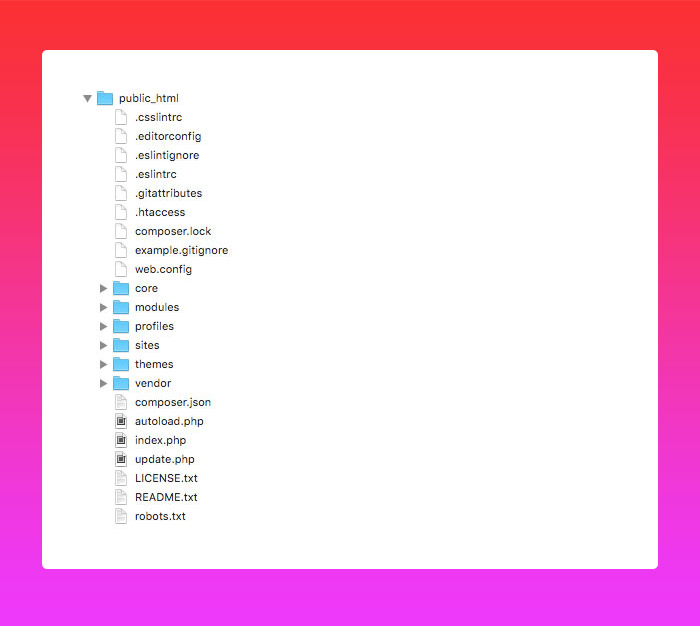
3. The next step is to unzip the file that we just uploaded, normally the file manager of the panel has the option "Unzip" or "Extract", if we do not have these options, then instead of uploading the compressed file, We will do it will decompress it in our computer and upload to the root folder all the files and folders with the same structure that they have inside the compressed file. Once this operation is finished, we can delete the compressed file that we had uploaded initially, so that in our root folder it is as follows:
4. Create translation folder. This step is only necessary if you want to install Drupal in a language other than English, for this you need to create the folder "sites / default / files / translations", in the newly created folder structure we will navigate to "sites"> "default" and We will see that the folder "files" does not exist, we create it and within it we create "translations", to avoid problems of permissions during the installation, we will assign "777" permissions to both the files folder and translations, Installation can be modified to apply a more restrictive configuration.
5. Create settings.php file. In the "sites / default" folder, we will duplicate the default.settings.php file and name it "settings.php" in the new file. We will also assign "777" permissions.
Minute 2. Prepare database
The second essential component of our installation is the database, for it is necessary to create it from the panel of our hosting, in the option "Manage databases" or "Management of MySQL" or a similar name, the final objective is to arrange The name of a database and the name and password of a user authorized to operate with that database, the steps to follow vary depending on the control panel that is used, but are usually the following:
1. Create database by naming it.
2. Create database user, assigning him the newly created database so that he can operate with it.
In some panels these two operations are performed simultaneously from the same database creation window.
Minute 3. Run installer
It is the moment to open with the browser our web page, if the source code has been correctly incorporated, the installation page will automatically appear in which we must go selecting the options that most interest us to configure our site drupal:
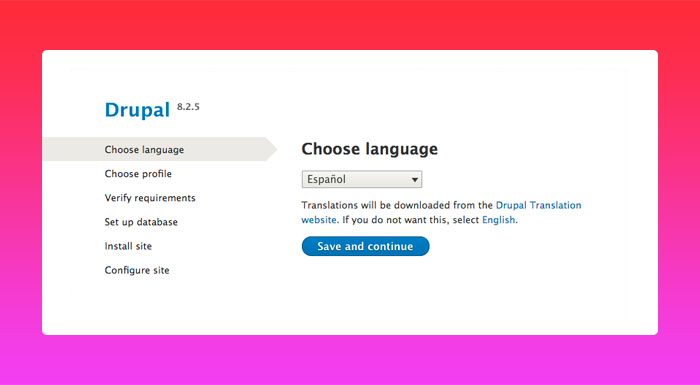
1. Select language. In this case select "Spanish" and click on "Save and continue"
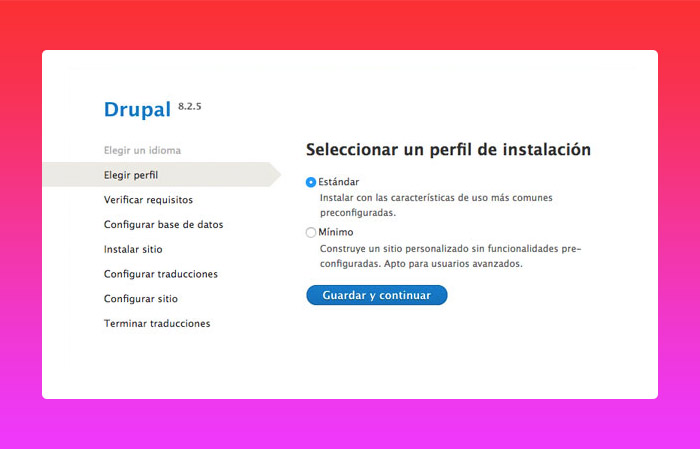
2. Select profile. We will select the option "Standard", since it incorporates the most common preconfigured features, the option "Minimum" is indicated for advanced users who want to build the site from scratch by personalizing all the functions.
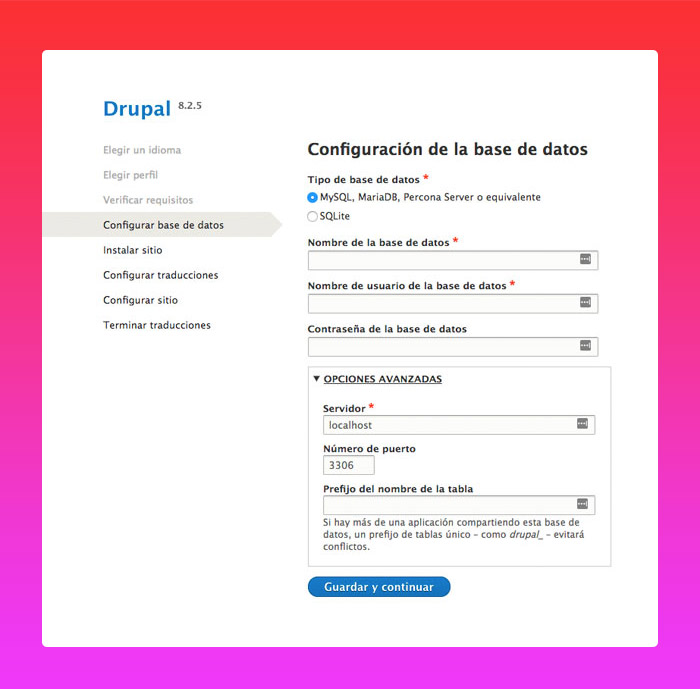
3. Configuration of the database. In this window we will introduce the names of the database and the user that we had created, as well as the password that we had defined, normally the advanced options do not need to be changed unless the server configuration requires it.
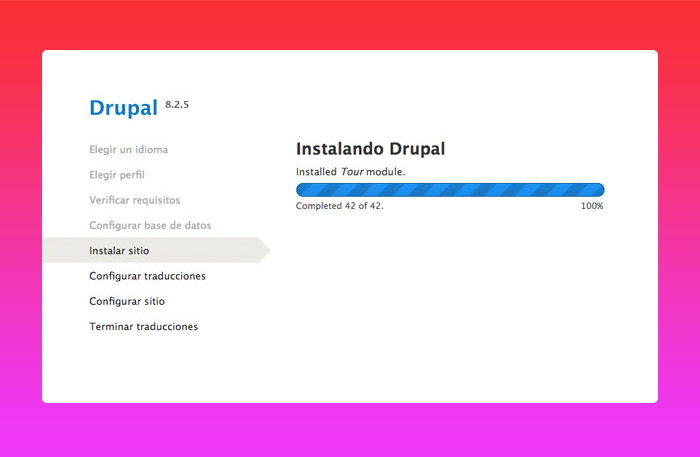
After pressing "Save and continue" will begin the installation of the system components and then import the necessary translations into Spanish, the installation time may vary depending on the speed and power of the server that we are using, all this time , A progress bar and an informational text will appear on the screen indicating what is being done and the percentage completed.
Minute 4. Set up site
At the end of the process a screen will be displayed where we have to configure the basic system information:
1. Name and email of the site
2. Admin user name, email and password
3. Default country and time zone
4. Updates
We click on the save button and our drupal site will load for the first time with the session started for the admin user.
.jpg)
Minute 5. Change file permissions settings.php
Once the installation is finished it is time to change the permissions of the settings.php file, the recommended permissions are 444, ie, to delete the permissions of writing and execution for all users, this is very important since if it was not done we would be Creating a huge security hole on our website.
Got it! We already have operating our website in Drupal 8.
With Drupal 8 we have a system with extensive configuration possibilities, we can add new functionalities by installing one of the thousands of modules available on drupal.org or by custom creating what we need and incorporating a personalized theme that gives a unique look and image.
We will have a reliable, secure and scalable system focused on performance, we will not have to worry about whether it will respond to the growth rate of our business, since Drupal can meet the needs of both a small blog and a global corporate website with thousands of users and millions of page views.


